4 large eggs
2 cups plain dried breadcrumbs
1 T. plus 2 T. Dijon mustard
coarse salt and ground pepper
1 T. plus 2 T. finely chopped fresh sage
1/4 c. unsalted butter, melted
1/4 c. vegetable oil
8 bone-n pork chops (1" thick, 2.5 -3 pounds total)
1. In a medium bowl, whisk together eggs, mustard, and safe and let stand 15 minutes. Meanwhile, pound each pork chop (avoiding bone) between two pieces of plastic wrap to a 1/4" thickness.
2. Spread breadcrumbs on a rimmed baking sheet and season with salt and pepper. Pour egg mixture onto another rimmed baking sheet. In batches, season pork chops with salt and pepper and coat in egg mixture. Gently shake to remove excess, then dredge in breadcrumbs, pressing to adhere. Freeze pork chops. (see below)
3. To serve, heat broiler. Place rimmed baking sheet in broiler to heat. For each frozen chop, combine 1 1/2 teaspoons melted butter and 1 1/2 teaspoons oil; brush on both sides. For each batch of two, place chops on sheet and broil until both sides are deep golden brown, 10-15 minutes, flipping halfway through.
How to freeze: Layer pork chops between sheets of freezer paper and transfer to two 1-gallon freezer bags. Press air out, seal bags, and freeze flat. Store in freezer, up to 6 weeks.
*recipe found in Everyday Food: A Martha Stewart Magazine (March 2010)
Sunday, April 18, 2010

Wednesday, April 7, 2010
Cooking With Kids
There are lots of great things to do with kids in the kitchen. Noah (our 2 year old) has been helping me with this and that in the kitchen. Here are some things we have been cooking up.
Noah helps tear biscuits (sometimes he will actually use the pizza cutter I give him) for Garlic Monkey Bread.
 Helps spread shredded cheeses on pizza and quesadillas.
Layering the ingrediants for lasagna
Putting cupcake liners in the tin.
Helping role out pie crust.
Using cookie cutters for sugar cookies
Stirring juice (we have a quick stir pitcher from Pampered Chef)
Always helpful when it comes to stirring and pouring (usually dry ingrediants but he is getting better at the wet ingrediants not to spill).
Getting plates and silverware to the table.
He is a great taste tester!

Noah helps tear biscuits (sometimes he will actually use the pizza cutter I give him) for Garlic Monkey Bread.

Layering the ingrediants for lasagna
Putting cupcake liners in the tin.
Helping role out pie crust.
Using cookie cutters for sugar cookies
Stirring juice (we have a quick stir pitcher from Pampered Chef)
Always helpful when it comes to stirring and pouring (usually dry ingrediants but he is getting better at the wet ingrediants not to spill).
Getting plates and silverware to the table.
He is a great taste tester!

Monday, March 29, 2010
The Incredible Egg


There are so many fun and different ways to decorate eggs for Easter. I don't exactely remember where I say this idea, probably another blog. But it is very simple:
Plastic Eggs
Fabric Strips
Modge Podge
Wax Paper
As with any other modge podge project, coat the egg with modge podge, lay a strip of fabric on the egg and start coating it with modge podge. I snipped little notches/cuts down both sides of the 1/2" fabric strips so they would lay flat. Happy Easter!
Now I Lay Me Down To Sleep...


Can you tell that is says 'NOAH'? It is a my first attempt to use Wonder Under and applique, I don't think I did too bad. And all that really matters is that Noah loves his name on his pillowcase.
If you read our family blog you will know that Noah, our 2 year old, has graduated to a toddler bed but has yet to sleep a full night in it. We have been trying little tricks to make his 'big' boy bed extra special, and I get to try out some new sewing. Anyone else doing a little sewing these days?
Sunday, February 28, 2010
Piggy Bank
So I have been searching for the perfect piggy back for our little fella, and I could never find one I loved. So I decorate one myself. Here is what you need:
piggy bank, found at Michel's
scrapbook paper, cut into pieces or torn for the edge look
modge podge
brush
paper letters
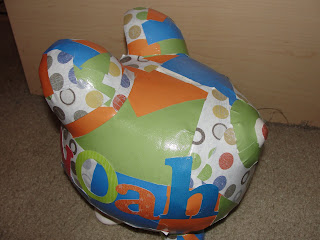

piggy bank, found at Michel's
scrapbook paper, cut into pieces or torn for the edge look
modge podge
brush
paper letters
Here is the finished product:


Ruffle Apron

Another dishtowel apron. This time I made just a half apron or one that ties around the waist (I guess all aprons tie around the waist), well anyway by the pictures you see what I mean. I work at a school and a wonderful family gave me these dishtowels for a Christmas gift. They are very cute but I am pretty bad at remembering I have holiday dishtowels and always forget to get them out or I get them out and they don't get put back after the holidays until summer ;-) Anyway, I can hang an apron with my others that are always up for the fun of it. Forgive me for my lack of instructions, it is pretty basic so I pretty much just wanted to show off what I had accomplished!
1. I found the middle of the first apron and cut it in half the short way.
2. Cut a 5" strip lengthwise on the second dishtowel to make the ruffle.
3. Pin the ruffle strip about every 3", and sew.
4. I attached a coordinating ribbon to each side for the tie (about 12").

Tuesday, February 23, 2010
Reuse: Formula Cans
Now You aren't going to do this to every formula can that comes with a little one but I cleaned up a few and made these cute storage tins. I have used these cans for several different things as our little guy has grown. At first it one held lotions and creams, another small toys next to our changing table. Lately they have been used as crayon containers and markers for easy and gun storage to bring our and sit at the table. And might I add super cheap when you aren't thinking about how much you paid for formula.


What you need:
* empty, cleaned formula can (s)
* 12x12 scrapbook paper
* ribbon
*stickers
*adhesive
1. I don't recall how tall the cans were, I will get back to you about that, but measure the height and cut your 12x12 paper to that height.
2. Roll adhesive on the short end of your paper and start to place the paper onto your can, add adhesive as you go.
3. Embellish the can with any ribbon or stickers you wish to add.
4. I did keep the lids and painted them in a coordinating color to the paper.
Subscribe to:
Posts (Atom)