Monday, March 29, 2010

Now I Lay Me Down To Sleep...

Can you tell that is says 'NOAH'?  It is a my first attempt to use Wonder Under and applique, I don't think I did too bad.  And all that really matters is that Noah loves his name on his pillowcase.
If you read our family blog you will know that Noah, our 2 year old, has graduated to a toddler bed but has yet to sleep a full night in it.  We have been trying little tricks to make his 'big' boy bed extra special, and I get to try out some new sewing.  Anyone else doing a little sewing these days?

Sunday, February 28, 2010

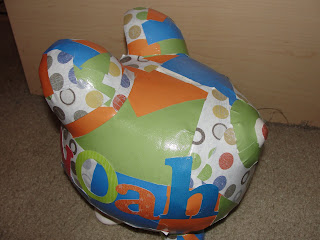
Piggy Bank

So I have been searching for the perfect piggy back for our little fella, and I could never find one I loved.  So I decorate one myself.  Here is what you need:

piggy bank, found at Michel's
scrapbook paper, cut into pieces or torn for the edge look
modge podge
brush
paper letters

Here is the finished product:

Ruffle Apron

Another dishtowel apron.  This time I made just a half apron or one that ties around the waist (I guess all aprons tie around the waist), well anyway by the pictures you see what I mean.  I work at a school and a wonderful family gave me these dishtowels for a Christmas gift.  They are very cute but I am pretty bad at remembering I have holiday dishtowels and always forget to get them out or I get them out and they don't get put back after the holidays until summer ;-) Anyway, I can hang an apron with my others that are always up for the fun of it.  Forgive me for my lack of instructions, it is pretty basic so I pretty much just wanted to show off what I had accomplished!

1.  I found the middle of the first apron and cut it in half the short way.
2. Cut a 5" strip lengthwise on the second dishtowel to make the ruffle.
3.  Pin the ruffle strip about every 3", and sew.
4.  I attached a coordinating ribbon to each side for the tie (about 12").

Tuesday, February 23, 2010

Reuse: Formula Cans

Now You aren't going to do this to every formula can that comes with a little one but I cleaned up a few and made these cute storage tins.  I have used these cans for several different things as our little guy has grown.  At first it one held lotions and creams, another small toys next to our changing table.  Lately they have been used as crayon containers and markers for easy and gun storage to bring our and sit at the table.  And might I add super cheap when you aren't thinking about how much you paid for formula.


What you need:
* empty, cleaned formula can (s)
* 12x12 scrapbook paper
* ribbon
*stickers
*adhesive

1.  I don't recall how tall the cans were, I will get back to you about that, but measure the height and cut your 12x12 paper to that height.
2.   Roll adhesive on the short end of your paper and start to place the paper onto your can, add adhesive as you go.
3.  Embellish the can with any ribbon or stickers you wish to add.
4.  I did keep the lids and painted them in a coordinating color to the paper.

Wednesday, February 10, 2010

1 Bag, 5 Meals

Recipes from Sandra Lee Semi-Homemade oct/nov '09 Click Here For Recipes!

Day 1 ~ Chicken & Dumplings
Day 2 ~ Chicken Fried Steak with Cream Gravy, Thyme Biscuits and Sour Cream Mashed Potatoes
Day 3 ~ Spicy Red Beans and Rice
Day 4 ~ Oven Fried Pork Chop with Roasted Red Potatoes and Buttery Green Beans
Day 5 ~ Italian Pot Roast

Grocery List:

Fruits and Vegetables:
1 small onion
4 medium carrots
red potatoes
green beans
russet potatoes

Meat and Poultry:
1 rotisserie chicken
4 boneless, center-cut pork chops
16 oz. smoked andouille sausage
4 cubed steaks
1 (2-2 1/2 lb.) chuck roast

Dairy:
shredded parmesan cheese
grated parmesan cheese
unsalted butter
1 (8 oz.) shredded monterey jack cheese
1 (8 oz.) sour cream

Packaged Goods and Others:
1 (10 oz.) pkg. frozen seasoning blend, McKenzie's
2 (8.8 oz.) pouches ready to serve long grain rice, Uncle Ben's
2 (15.5 oz.) cans red beans
1 (10 oz.) cream of chicken (I have been substituting cream of celery)
saltine crackers
all-purpose baking mix, Bisquick
Italian-style panko
beef broth
chicken broth
olive oil
dry red wine
cajun seasoning, Tony Chachere's

Sunday, January 24, 2010

Thanksgiving


Give Thanks! I decorated our fireplace and table (they moved around a bit) this thanksgiving with these little signs that spelled out 'Give Thanks'. If you have a larger table or space you can make yours to say ' Happy Thanksgiving' or other variations. Items needed:

20 5x5 coordinating scrapbook papers (you need two pieces for each letter, I have 10 letters in 'Give Thanks so I needed 20)
10 4x4 solid colored cardstock
letter stamps or permanent marker, if you choose to free hand your letters
10 (again, depends on how many letters) twigs or kabob skewers
adhesive
ribbon
washable paint
10 votives or juice glasses
decorative peddles, sand, or I used acorns

1) I put my sons hand prints on each 4x4 piece of cardstock before you stamp our free hand your letters on the 4x4 cardstock.

2) Adhere the 4x4 piece of cardstock on a piece of 5x5 scrapbook paper. I choose paper with a fall leaf print.

3) Sandwich the twig or skewer between the 5x5 paper that you adheared the cardstock to and another piece of 5x5 paper. You will only have a letter on one side.

4) Place each sign into a votive/glass of rocks/sand/nuts.

* I hope the pictures explain it better than I.
* I got this idea from a magazine, I believe it was family fun, I did not come up with it on my own sadly.

Bread Pudding


A few weeks ago I went out to lunch with the ladies I work with. We had a wonderful lunch and for dessert we shared a bread pudding. I had never actually eaten bread pudding before and had always imagined it to mushy and not so yummy. But when it arrived at our table it was beautiful plus there were chocolate chips in it, YUMMY. I came home and searched for recipes and made a bread pudding of my own, if I don't say so myself it was very good! I got the bread pudding recipe from momswhothink.com:

2 c. whole milk (or 2 c. half & half)
1/4 c. butter
2/3 c. brown sugar
3 eggs
2 tsp. cinnamon
1/4 tsp. ground nutmeg
1 tsp. vanilla
3 c. bread, torn into pieces
1/2 c. rasins (optional)
1/2 c. chocolate chips (my own customized ingrediant, optional)

1. In medium saucepan, over medium heat, heat milk just until film forms on top. Combine butter and milk, just until butter is melted. Cook to lukewarm.

2. Combine sugar, eggs, cinnamon, nutmeg, vanilla. Beat with an electric mixer on medium for 1 min. Slowly add milk mixture.

3. Place torn bread pieces in a greased 1 1/2 qt. casserole dish.

4. Sprinkle with raisins and/or chocolate chips. Pour milk mixture over top.

5. Bake at 350 degrees for 40-50 mins, or until set. Serve warm.